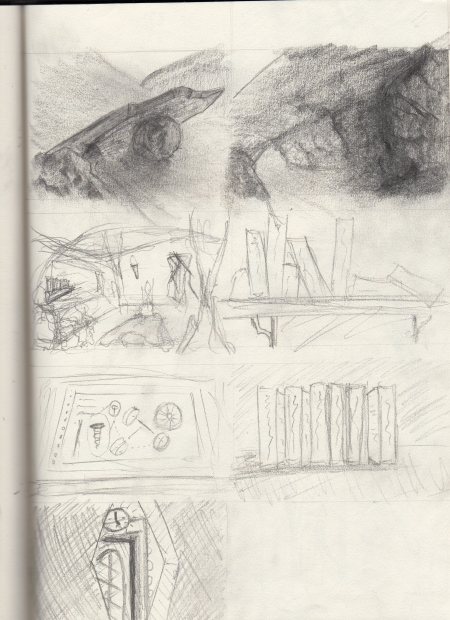
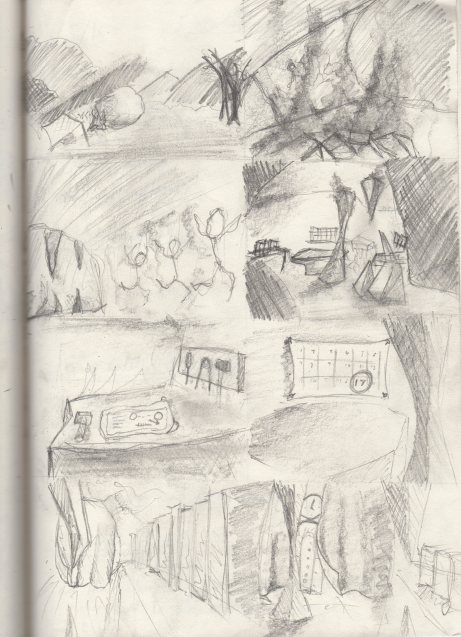
Below is my first story board, this was a quick sketch I used to later create my concept/storyboard piece also listed below. The first storyboard was me just quickly getting my first ideas down which later helped me to layout my second storyboard on Photoshop. This second story board was more for expressing the mood and colour for me scene than it is for showing the camera angles.
My third story board, although similar to my first one is a better representation of the camera angles and detail I intend to use in my scene and is more inline with my animatic. Currently I feel there are not enough shots within my story board really tell my story in a clear manner, so I will be creating another, more detailed storyboard, in the future.
Here are the first screen shots from the basic blocking out of my scene. I have been playing around with the camera angles and basic lighting to give a feel for the mood of the scene. The first shot is to give the environment a setting, up in the mountains, dead trees, pale light, all these help the audience identify the location and weather. From the outside everything looks like a normal cave dwelling. As we move inside there is a more warm glow from the fire, giving a homely feel. On the walls and surfaces we see odd objects you wouldn’t expect most cave men to have. Currently there are blue prints, tools, books and calendar on the wall. I’m still going to add some fur pelts on the floors and walls; also some kind of bedded area and general clutter so it looks lived in. There is a mysterious blue light coming from the back, obscured by a curtain, this I intend to stay hidden and just subtly show a flickering blue light, to make the audience curious and then, towards the end, reveal the source.
Here is my first animatic based off of my third story board, it is currently not as long as i wanted it to be and doesn’t contain enough detail to convey my story as I want it to, however it does give a good example of the setting with the first few seconds. I’m still undecided on the concept of having it all in one shot, although it may look nice, I’m unsure whether or not it is appropriate for this piece. It was created by attaching the camera to a motion path and parenting the aim to certain aspects of the scene, I have done this to create as smooth a camera movements as possible but at some points it is still not how I want it to be, this will be improved with further refinement of the technique, which is still quite new to me. I will be creating another animatic with separate shots, some of which can be seen in my blocking renders.
For the portal like time machine, I wanted to create some fluid effect to simulate the portal aspect of it. I hadn’t worked with fluid effects much before, other than using Bifrost, and as it is an area I am greatly interested in, I wanted to take this opportunity to develop my skills and also to enhance my final piece.
Here is the tutorial I have been using to help me better understand Fluid Dynamics. In this tutorial he creates a tornado and I have used similar techniques to create my portal effect, sort of like an inverted tornado.
The main issue I have had with these simulations, is the amount of time it takes to simulate when using a high particle count, this is necessary however to make it look more realistic. These effects also have a big impact on the render time, which is why I have allowed myself more time to render in my Gant Charts.
Below is my second animatic, this animatic has an improved camera over the first, as well as, the final cave model, extra assets and lighting. The camera is still not perfect and a few of the assets such as the fire are not quite up to scratch. However this gives a good example of the finished product.
I needed to create a backdrop for my out door scene do to the blank space behind the mountains and to give a more realistic look to the scene. I’ve been tying my hand at some basic matte painting, to do this I have been using these two images and blended them together to create the environment I wanted. I have set it up so that the sunlight in the images follows the sun direction within my scene. I then layered them on top of each other and erased any unwanted parts. Next I changed the levels, colour balance, hue and saturation until both images looked like they came from the same image. And finally I added some Gaussian blur to give the impression that it is in the distance.
Image 1
Image 2
Blended Together
Added Gaussian Blur
After placing it into my scene I noticed that the colours did not mach up to the colours in my scene so as a final step I have adjust the colour balance to follow the same scheme as my environment.
Here is just the rendered image sequence from straight from Maya, I have included this to show the work done on after effects in the post production stage.
In After Effects I first started by tracking the camera movement, so my background would move within the same motion of the camera, I also added distortion of the edge of the background to align with the compositions high FOV. This camera track would also prove to be useful later on during the process, when I was adding the snow flakes, the camera track made it possible for the camera to move through the swirling snow and give a real sense of depth and reality to the scene. To create the snow I used the TrapCode Particular plugin, a particle FX plugin. Next was adding in a slight vignette, again to add depth, and adding some colour grading, the biggest changes would be bumping up the saturation to make it pop and adding an orange hue to better link the colour schemes between the three different scenes. At the end I have added a few flashes of the portal with a figure of a man coming through it, I have added this as I was unsure how clear the narrative was and I needed something to represent that it was a time machine. Lastly I added the sound effects, I have tried to match the sound to the camera, so sounds are louder as the camera is closer and quieter when its further away, I also added some reverb to the effects within the cave, this reverb really gives the viewer a sense of place within a cave.
Final Video
Conclusion
Looking back over my video and the project as whole I am quite pleased with the outcome. During the process I have I have greatly improved my skills of modelling and texturing and also my lighting and camera skills have improved. I have learnt how to create and use particle and fluid dynamics effectively, along with gaining new plug in knowledge of FumeFX. I wanted to start using Houdini for this project but after creating some fire within Houdini, I realised when trying to render, that the student version of Houdini has a large water mark on it so I was unable to use it. This led me to use FumeFX, a plug-in for Maya for creating smoke, fire an explosions. If given more time I would have liked to spend more time refining the look of the fire. Being my first time I’m OK with the look, but I would have liked to increase the resolution of the flames to make it look more realistic. However this would’ve taken a big hit on the render time and I wouldn’t have enough time within my plan. Another thing I would improve next time is just making the whole animation a bit longer, spending more time on key moments in the scene, at the moment I think it moves too quickly through certain parts and it can make the narrative unclear. This again however, would not have been possible at it would’ve taken too long to render. Finally I would have liked to render everything at a higher resolution. At the moment the resolution is set to 960×540, I did this to try and improve the render times and have a finished product to show. I will be re-rendering everything in 1080p later on so I have something of a higher quality to include in my show reel.